Monday, July 5, 2010

HP 82929A - Programmable ROM Drawer Clone

The HP 82929A Programmable ROM Drawer is one of the many accessory modules available for the HP Series 80 personal computers.


The module fits into one of the rear expansion slots and allows you to add your own code resident in PROM or EPROM, or any of the old original ROM modules for which images are available on-line.


After removing the enclosure of the HP 82929A module you will find two 28-pin DIP sockets that can accommodate either two 4KByte (2732) or two 8KByte (2764) EPROMs. Each ROM module image is 8KBytes, then using 2764 EPROMs you can add two additional ROM module images with the HP 82929A module.


Project Description


Given that the HP 829292A is one of the hard to find accessories to for the HP Series 80 and it's a must have if you don't have some of the original expansion ROMs such as the Assembler ROM, the primary goal of this project is to design and build a functional clone of the HP 829292A module.
The final goal is to be able to use a microcontroller to emulate the external ROMs but use the microcontroller FLASH memory to hold single or multiple images of the expansion ROMs (a similar approach was used to emulate the expansion ROM cartridges for the HP-41 calculator).

This project will have several phases.

The first phase is to design an equivalent circuit to the original HP 82929A using off the shelf CMOS/TTL currently available components and build a prototype.

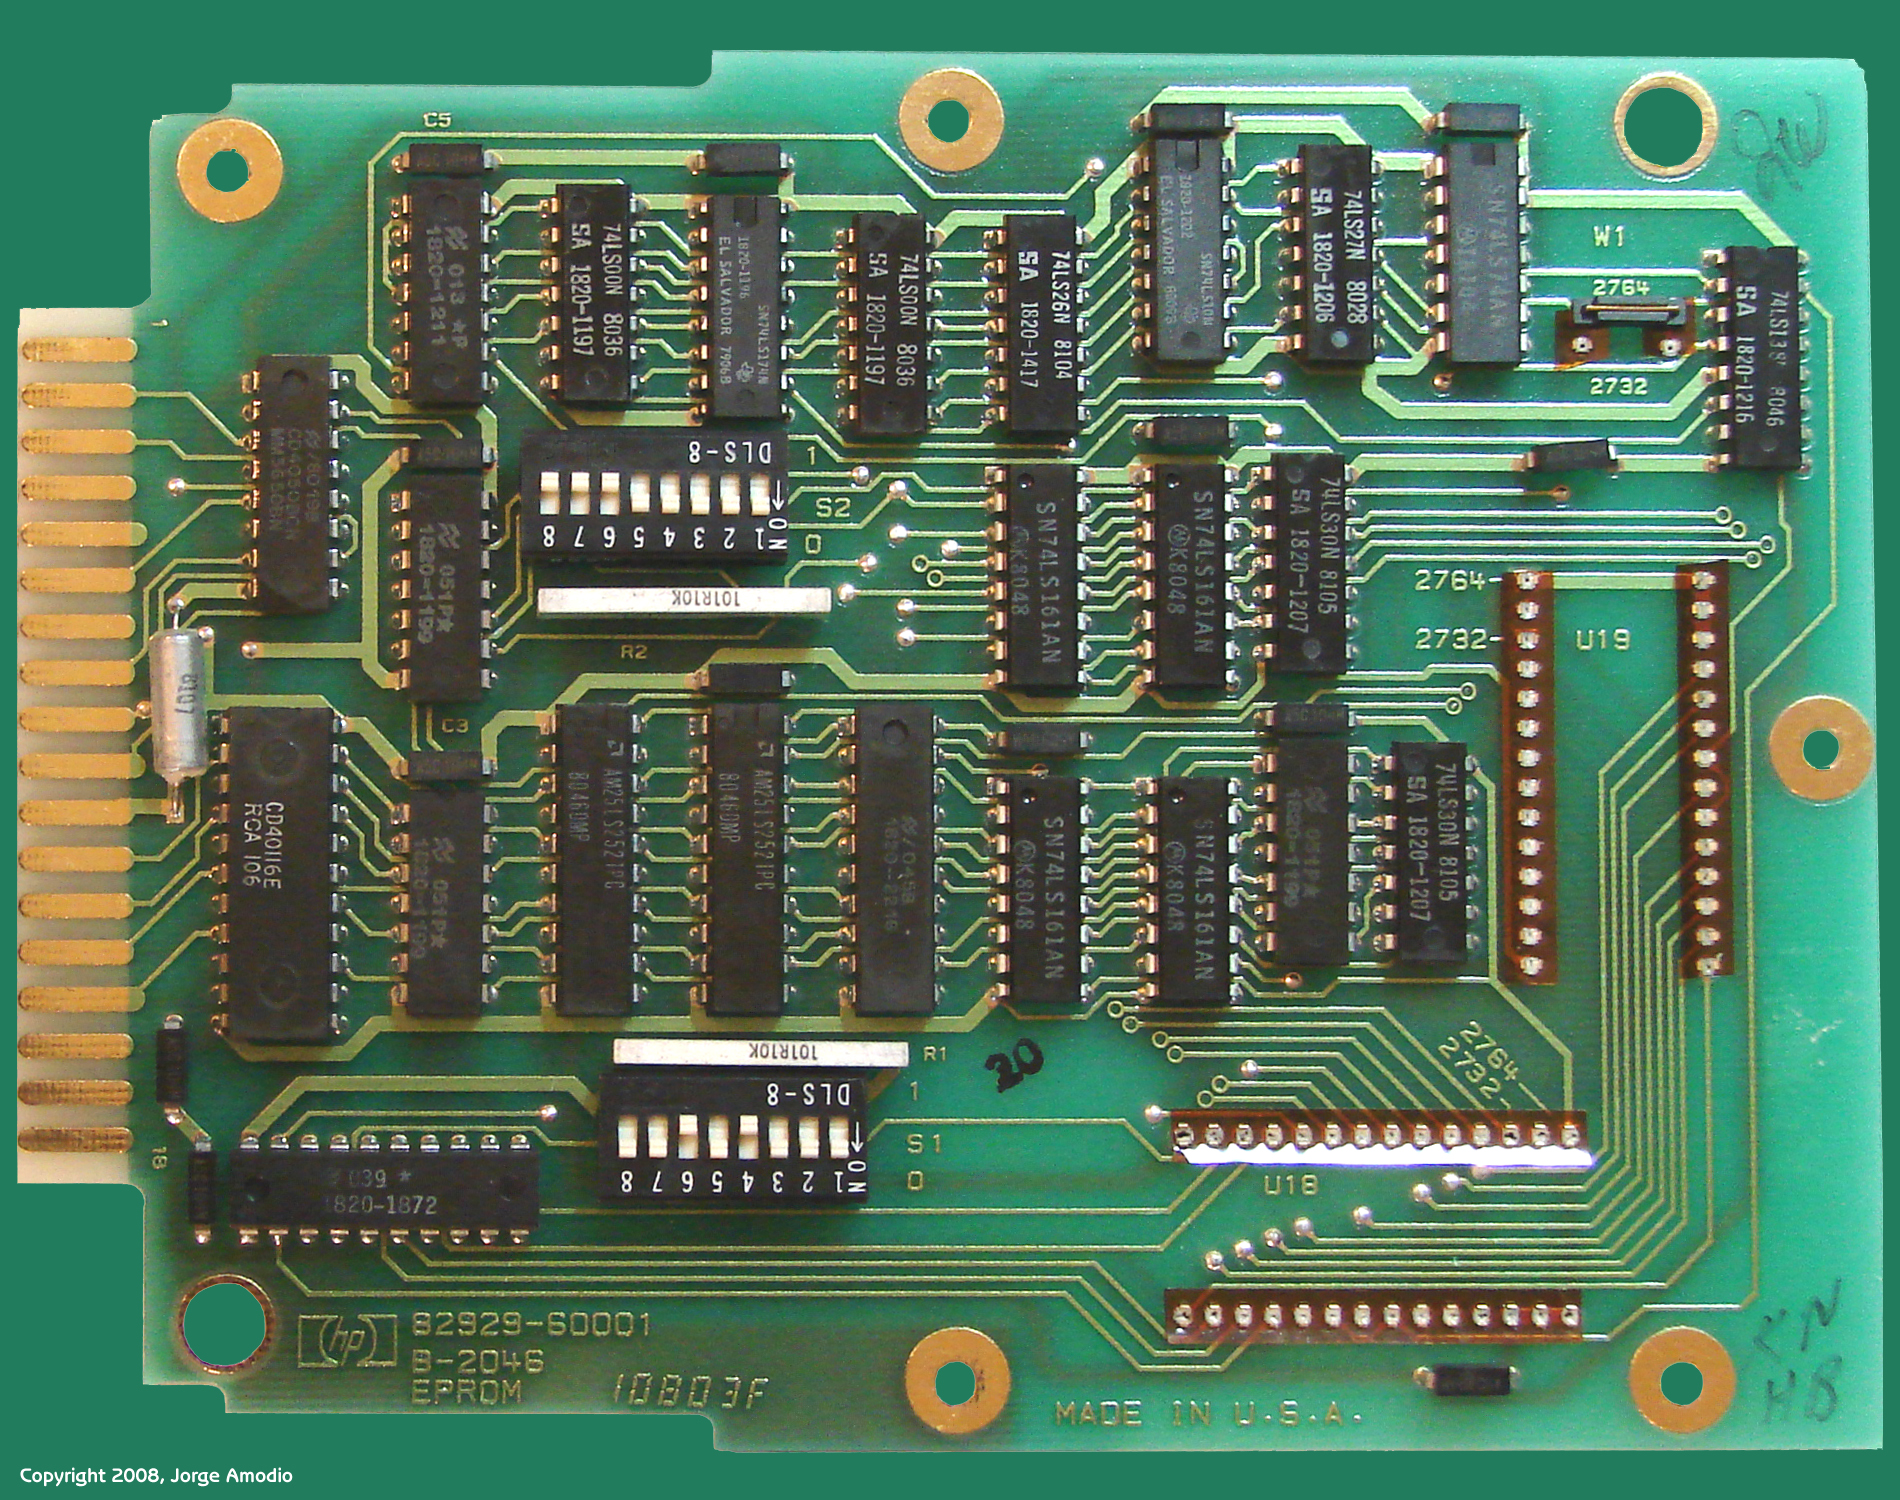
For this phase we will rely on the schematics obtained by reverse engineering an actual HP 82929A module.

The second phase will be to gather detailed timing specifications and requirements using the clone prototype as a test bed for the selection of an appropriate microcontroller and basic architecture of a second generation clone prototype.

Third phase will be then to develop the microcontroller based clone and associated firmware.

Project Progress

Based on the schematics obtained from the original HP 82929A board and a quick search& of available parts at Mouser Electronics, DigiKey and Jameco, I put together a new schematic that has some minor modifications from the original:


  • The bidirectional CD40166 (CMOS/TTL buffer/level translator) was replaced by a pair of 74HC244 tri-state octal buffers.
  • Instead of using 4 74LS161 4-bit binary counters that conform the Address Register and counter, I used a pair of 74F269 8-bit binary counters that provide the same functionality.
  • As a replacement for the pair of AM25LS25121 8-bit identity comparators I used a pair of 74ACT521, you can also use 74LS688 which provide the same function.
  • I didn't include an equivalent to the DM81LS96 present in the original design since it's not necessary to invert the data lines and the EPROMs already provide 3-State functionality. I just then modified the connection to the Output Enable pin of the EPROMs.
  • I added two LEDs, one (red) to show the status of Vcc, and the other one (green) to show when any of the two EPROMs are selected.
With the changes mentioned above I put together a first prototype board using standard
DIP parts and wirewrap sockets. The end product is shown in the two pictures shown below.


HP 82929A Clone prototype board
HP 82929A Clone prototype board - Bottom side

The next step is to connect the prototype board to the HP-85 expansion slot and test if everything works as expected. You may have noticed the prototype board has a 40-pin IDC connector, this connector is intended to be the attachment to the HP-85 expansion slot via a flat cable.

I've been thinking and working about different alternatives to connect this prototype board, one was to just design and put together a bus extension car that some colleague told me at some moment was a real accessory from HP for troubleshooting I/O applications using the expansion bus. Unfortunately I was not able to find a vendor that had the female pcb edge connectors in stock.

While I was doing some research about the HP-85 bus signals I had one machine with a flat ribbon cable coming out from the cabinet, each wire was soldered directly to the back of one of the expansion slot edge connectors and on the other side terminated on a long male pin header attached to a solderless breadboard.

This alternative was quite ugly but cheap and it worked, but I was not very comfortable (much less having small kids hanging out in my office/lab daily) to leave the wires permanently connected to the guts of the HP-85, also this option didn't let me move the connection to another machine (I've a small collection of HP Series 80machines). It served anyway to prove that using a flat cable didn't introduce too much noise on the bus and the signals on the other end were fine.

I designed different small boards with a card edge connector matching the expansion slot of the HP-85, finally I decided to go with a version that has the 40-pin IDC connector for the flat cable and pads for a pin header so I can use the same board to terminate the flat cable on a solderless breadboard.

The following two pictures show how the pcb came out and fits on the I/O expansion slot. Don't pay much attention to the cheap solder mask (actually is nail polish), also I didn't have an IDC connector in angle then I'm sort of loosing at least one slot but for prototyping purposes it really doesn't matter much.

HP Series 80 I/O expansion bus extension to flat adapter
Flat cable adapter installed on the HP85 expansion bus
As expected and applying Murphy's law, the board didn't work on the first try.
I had an error in the schematic for the original module, the Chip Select signals for the EEPROMs were permuted, and I also had few wiring mistakes.

To increase reliability I added pull-up resistors to the data outputs of the EEPROMs. The previous design of an EEPROM board by HP for internal use had pull-ups and a 80C97 three-state buffer that in this design is substituted by a 74HC244.

While troubleshooting I found that the RC (Read Control) signal is quite sensitive to additional loading, such as the oscilloscope or the logic analyzer probe.

After correcting the wiring errors and removing the extra load on the RC signal the thing worked very well, even with a longer flat cable of about 4 feet.

Below is a picture of the clone module being tested on a HP-85A with the Assembler and Service ROM images on a pair of 27C64 EEPROMs.


HP 82929A Programmable ROM Drawer Clone prototype under test on a HP-95A
I'm not sure yet if I'll invest the time and money to develop a pcb layout for this version of the clone, if I do for sure the new design will use SMD components to minimize PCB size.

Project Status

The clone prototype is fully functional, I tested it with several ROM images and on various machines of the HP Series 80 family.

I spent some time doing additional research on the bus signals trying to have a better understanding on how all pieces fit together and see if it would be possible to emulate the ROM Drawer with just a microcontroller.

For the phase I put together some hardware using some basic glue logic and drivers, and a Microchip PIC32MX 32-bits microcontroller. I wrote various versions of firmware trying to emulate by software the address decoding and bus demultiplexing and ROM data lookup which was actually implemente as a constant array in the firmware and programmed on the microcontroller FLASH memory.

With the PIC32MX operating at the specified maximum clock speed (80MHz), the CPU does not have enough cycles to process all the required instructions to be in sync with the HP-85 phased clocks.

I was able to obtain better results overclocking the PIC32MX up to 120MHz, but this is not a very reliable configuration.

The firmware architecture and algorithm I put together using two of the HP-85 phased clocks connected to two interrupt lines on the PIC32MX seemed to be a viable approach, I could have obtained better performance from the PIC32MX I wrote the code directly in assembler instead of C, but the MPLAB C32 is quite efficient and there is no much fat I can take out.

One option I'm still considering is to switch to a different and faster MCU, or put together an hybrid of an MCU with some more complex glue logic for address decoding and bus multiplexing implemented with a CPLD or FPGA.

In some email exchange with Everett Kaser he suggested why not just emulate the entire HP-85 in a microcontroller, build a small box a la Mac mini and add a keyboard and display and voila you have a modern HP-85.

Not a bad idea, added to the never ending list :-)

I will leave this idea for another future article ...

Project Files and References


HP 82929A - Programmable ROM Drawer

HP 82929A Solder Side
HP8229A Component Side
The HP 82929A Programmable ROM Drawer is one of the many accessory modules available for the HP Series 80 personal computers.


The module fits into one of the rear expansion slots and allows you to add your own code resident in PROM or EPROM, or any of the old original ROM modules for which images are available on-line.

After removing the enclosure of the HP 82929A module you will find two 28-pin DIP sockets that can accommodate either two 4KByte (2732) or two 8KByte (2764) EPROMs. Each ROM module image is 8KBytes, then using 2764 EPROMs you can add two additional ROM module images with the HP 82929A module.


Project Description

The primary goal of this project is to reverse engineer an original HP 29829A module and obtain a full set of schematics. Since the module does not require or use any specific custom HP parts only standard (some of the original ICs may be obsolete today and hard to find) CMOS and TTL parts it won't be hard having the schematics to make a clone or equivalent module.


Also having the schematics and a better understanding about how the HP-85 I/O bus works will provide valuable information for another project in the list that is to emulate many expansion modules and interfaces with a microcontroller based board.


This process has been done in the past, but besides some high level description of the PRM-85 developed by Bill Kotaska with support from John Shadbolt as a replacement for the HP 82929A, I didn't find much information available on-line.

John was quick to reply to my request for information, and I owe him a great deal of gratitude for his help and encouragement for this an other projects we discussed via e-mail. I also recently got in touch with Bill, we are already exchanging some information and ideas.

I also need to mention Everett Kaser who while at HP was involved somehow in the HP-85 development and provided additional information. When I was almost done with drawing the complete schematics Everett found and scanned the schematics for an old EPROM board that HP used to run the diagnostics code and for a 3 8-bit Digital Output ports. Both schematics helped to confirm and validate the one I was putting together.


Project Progress


I started putting together the schematics by following the traces using two high resolution pictures of the HP 82929A top and bottom sides posted by Vassilis Prevelakis in 2003 in the ClassicCMP mailing list.

Doing the solder or bottom side was obviously quite easy since you can see all the traces in front of your eyes, but getting the traces on the component or top side was a challenge. While the picture had good resolution some shadows on the ICs pins made it very difficult.

I was almost ready to hang the towel and keep searching for help on the net when John came to the rescue and let me put my hands on an actual and working HP 82929A module.

What I did first was to take high resolution pictures of both sides of the board. The pictures above on the right are a medium resolution version of the actual board. You can find a pair of higher resolution version in the links section below.

Now with the new pictures I sized them and mirrored the bottom side to match the top side. Using Adobe Pothoshop I created different layers for different elements such as pads and vias, top and bottom traces and legend for component IDs.

For the complicated and hidden traces on the component side I recurred to an ohm meter and also the logic that was showing up on the schematic I was putting together.

The following two pictures show the top and bottom sides and the pads, vias and trace layers for each side of the HP 82929A board.


Top side traces

Bottom side traces 
And turning off the layers with both pictures, the result was a complete layout diagram showing all the top and bottom traces for the board as shown below.

HP 92829A PCB Layout
Now with the complete board layout, time and patience was not too difficult to put the complete schematic together. It took me a couple of passes while I moved gates here and there to make the final schematic more easy to read and logically consistent.

As I do for many other projects I used Eagle CAD to enter the schematics and Adobe Acrobat to produce a pdf print out.

Project Status

This project is complete and the full schematics and additional information can be found in the links below.


Project Files and References

Sunday, July 4, 2010

HP Series 80

HP-85A Desktop Personal Computer (1980)
The Series 80 Personal Computer product line was introduced by Hewlett-Packard in 1980 with the HP-85 model which was one of the earliest integral desktop computers that in the same cabinet included the main computer, a printer and a tape drive.

Over the product line life span HP developed several models. The early and original HP-85 with 16KByte RAM and 32KByte System ROM was known as the HP-85A and was introduced in January 1980.

At that time I was already doing programming in BASIC and APL on the IBM 5100 and IBM 5110 computers, they had almost the same form factor as the HP-85, small CRT screen on the left, tape unit on the right and a full size keyboard and ROM resident BASIC interpreter.

The IBM computers had a decent version of BASIC for financial and office type applications, one of my early projects consisted in developing a payroll system to manage payroll for the teachers in my school. But the IBM stuff was pretty expensive and heavy, nothing that you can consider close to "portable", but the HP-85 was my favorite, much nicer design, cheaper and more oriented for engineering and scientific applications.

The HP-85 was the preferred choice as a controller for automated measurements, I still use one in my lab to control a bunch of HP-IB capable instruments.


HP-85 Naked !!
One interesting characteristic of the HP Series 80 was that its architecture was not based on any of the available microprocessors at that time, instead HP developed a set of specific custom large scale integrated (LSI) circuits for the HP-85 which let them reduce the number of external components and power dissipation enabling the use of air convection instead of the noisy fans for cooling.

Even for an 8-bit CPU (code named "Capricorn") running at a 614KHz the performance was very good, since the CPU was designed to use a multiplexed data and address bus optimized for multibyte transfers (frequently used by BASIC interpreter tokens and numeric values) and minimizing the need to constantly send addressing information for each read/write operation.

There are many publications and great sites available today with plenty of information about the HP-85 and the rest of the HP Series 80 family. There is a list of links at the bottom if this article.

Also the entire July 1980 issue of the HP Journal was dedicated to the HP-85 and in the August 1980 issue you can find an article from Todd Lynch about the LSI chips used in the HP-85, and courtesy of Eric Smith here is a copy of the patent application that Todd  and HP filed for the Capricorn CPU.


HP-87XM Desktop Personal Computer


HP Series 80 Projects

As I mentioned before, the HP-85 was one of my favorite machines, and there are many still in use and in good operating condition, but some of the accessories are very hard to find. For example I don't have some of the original expansion ROMs such as Assembler, Mass Storage, etc. I've been looking around for a while for a HP 82929A Programmable ROM Drawer to be able to use some EPROMs with the images of the missing ROMs, but with no luck yet.

On the other hand over the past few years I've been doing microcontroller based designs, then I decided to start some projects to get more juice (lets be frank, and also for fun) from the HP-85 and emulate some expansion modules and external interfaces using microcontrollers (if you know well the HP-85 architecture you must know that most of the external interfaces had an Intel 8049 microcontroller doing the job).

My first project on the list was to find/obtain/steal/replicate/materialize a HP 82929A Programmable ROM Drawer. I know that some folks have done it in the past but I didn't find much information available on-line.

Some time ago Bill Kotaska with support from John Shadbolt developed the PRM-85 as a replacement board for the HP 82929A. I tried to contact Bill but with no luck, but John was fast to reply to my request for information, without his help this first project would have been almost impossible to complete.

I also need to mention Everett Kaser who while at HP was involved somehow in the HP-85 development and is the author of one of the HP-85 emulators for Windows, provided great information and a lot of insight and encouragement, and Tony Duell, that if you you have ever read some forums/mailing lists about classic computing or retro computing you probably know that he has always something to say and interesting information to share, and Vassilis Prevelakis and the HP Computer Museum folks for making such a vast collection of manuals and information available on-line.

As time permits I'll be adding to this blog additional information, and status of various HP Series 80 related projects.


HP-86 Desktop Personal Computer


Here is a very useful list of links related to the HP Series 80 family of personal computers:
Enjoy
Jorge